This is for all the indie filmmakers out there experimenting with new outlets for marketing your creations. It used to be that you absolutely had to have a distributor to get your film out to markets that would otherwise have been impossible to reach. The Internet has changed a lot of that.
In this article I’m going to go over a few things that I did to create an interactive poster for my film The Cursed (when it was called Tenebrous). This could also be a new method of distributing the whole film, using freely-available tools online to create an interactive marketing package for one of my films. At the time, USB drives were not available in the storage sizes and prices that they are now, but I will cover any special steps with them also.
Please note that some familiarity with tech is required. To those of you out there that rely on the Internet for promotion and marketing, it shouldn’t be much more difficult that what you’re already used to, but some sleeve rolling and elbow grease is still required to assemble the necessary parts and tools.
The tools I used for this were all free. However, certain substitutions can be done depending on your comfort levels. I work with a $0 budget all of the time, and the tools that I used were more than adequate to do the job with no hassles or headaches.
The Problem
So you’ve got your film made and you want to get it out there, but YouTube doesn’t cut the mustard. You’ve also got tons of behind-the-scenes photos, interviews, etc., and you’d like to put those together also in an easy-to-explore format. You also don’t want to put it out on DVD, or you’d like to have some special branding. Heck, you may want to put your whole movie on there like this little gem by David Baker for MISSION X.
Whether on CD-ROM, DVD, Blu-Ray, or USB drive, you can now create a fully interactive tour of your film that lets people view pictures, listen to music from the soundtrack, watch clips, or even read the screenplay or parts of it. All within its own browser that you can lock down and brand with your own settings.
Note: this approach uses some HTML, so having a good working knowledge of it is recommended. If you’re not quite sure if you can do this, you can use a WYSIWYG editor such as Nvu (free) or Dreamweaver (not so free).
Before You Begin
Before making your interactive film app, plan a layout for how you want it to flow. What kind of graphics are you going to use? What kind of color scheme is there? How will people navigate around easily?
I use a whiteboard, but paper and pen work just as good for this step. The only limitation at this stage is your imagination and creativity. Trust me, jumping in without a design first will leave you spinning your wheels. This is not as difficult as, say, the pre-production on your film was.
Personally, I do not recommend having music or loud video kick in automatically on the default start page. This is a pet peeve. You want the viewer’s experience to be pleasant and want them to come back again. Also, if they bought your disc, you don’t want to make them regret having bought it.
Decide here what media you want to put your app on for distribution. This will make a difference in what you can include since storage sizes vary. If you decide to do multiple media types, which you can, then take into consideration all of their sizes and what you can put on them.
You should also look at your assets at this time and get a total filesize for them all. This includes pictures, videos, documents, music tracks, anything you want to put on the physical media. This in addition to Portable Firefox, which is itself about 38MB. Small, but if you’re using only 128MB USB drives, it could get expensive.
The Tools
A full list of links to the tools in this article is at the end.
Start by making a folder that will contain the internal layout of your project. I usually label these things “Name_Of_Project_CD”, since CDs are the first media I test on.
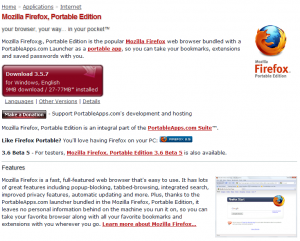
For this type of project, I had to assume that someone may or may not have the web browser and version with plugins that I might want them to have. So, the first step is to get said browser. I use Portable Firefox, which is not only small and fast, but also allows me to re-brand the titling and lock things down the way I want my project to be presented.
After I have Portable Firefox installed in the project folder, my next step is to install Adobe Flash player. Note that this method differs slightly from the way that you might be used to with the web browser on your computer, so follow the instructions carefully.
This instantly opens up Firefox as a richer multimedia platform, and, you don’t have to worry about whether or not it is installed on the viewer’s computer. You can also install other plugins that you might need or want, but for me this is more than enough to go forward.
Optional: Once you have this part done, make a copy of the folder. That way, you can start from this point on your other projects without having to go through this step in the process all over again.
Once you have everything installed, you can test it out by going to a site on the Internet. When you are testing, however, you should close all other copies of Firefox on your system, as well as any other web browsers. This will prevent Portable Firefox from trying to glom onto your other installs and use their settings.
One last step here before moving on: create another folder inside the project folder called “Site”. This will be where you will place all of the assets for your app. You can name it whatever you like, but I use Site in this article. Just remember what you called it in case you do deviate from this naming convention.
Change Branding
Warning: This is probably the most technically demanding part of this process.
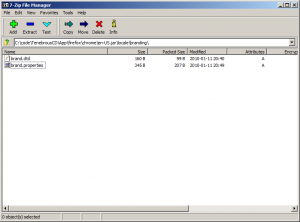
Suppose you want to change the branding text in the titlebar on the browser window. With Portable Firefox, it’s easy. Go to your project folder. You will see an Apps folder in there. Click on it to bring it up. Now drill down to the firefox/chrome folder. The branding for the browser is located inside the file named en-US.jar. This is the language file for US English; if you are in another country, load up the language file of your choice. It should be located in this same folder.
Some of you may be scratching your heads about JAR files. JAR files are in reality plain old zip files that you can open up in WinZip or any other compression program, such as 7-zip (free). To open them inside of Windows directly, change the file extension from .jar to .zip, and double-click.
Inside the zip file you will find a folder named “locale”. Click on it, and open the folder named “branding”. Inside here is the file that you want: brand.dtd.
Extract this file to your desktop or wherever else you can get at it. For most compression software all you have to do is grab the file and drag it onto your desktop.
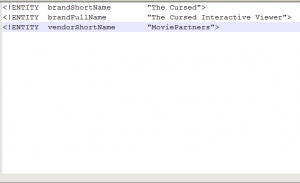
Next you’ll want to open it in Notepad or any other text editor. Do not open this in Word. A plain text editor will ensure that no extra junk gets saved with the file.
After opening it, you’ll notice that it’s not that big, only 3 lines. You can change the values for them accordingly, as shown below.
The one value you’ll be most interested in changing is brandFullName. This is the value that Firefox uses on the title bar. You can change the others as well, and Firefox will use them in their appropriate places inside the brower.
When you’re done editing, you’ll have to put this modified brand.dtd file back into the en-US.jar (or whatever language file you have) to make the changes show. In Windows or 7-Zip, just drag and drop the file back in. Start up Portable Firefox again, making sure no other copies are running, and you should see the change in the title bar.
Changing the Portable Firefox Icon
If you want to change the icon on the top-left corner of the window, you can swap out the appicon.ico file in the AppAppInfo folder with one of your own. As long as you name it appicon.ico, you shouldn’t have any problems, provided it is a Windows Icon file.
Adding Your Content
Remember that Site folder? Well, that’s where you’re going to put all your app’s content. I usually test while writing by placing everything in there to begin with. It saves a tedious step of copying everything over and over to the folder it’s going to be in eventually.
Start first by creating an index.html file and placing it in the Site folder. This will be your landing page. From here, you can add in whatever you want: images, sounds, etc. Organize it however you wish. I use sub-folders called images, music, and video to keep everything separated.
Bear in mind that the browser will not have an associated web server on your media also. Although that is possible, it is beyond the scope of this article. For now, consider that you’ll have to work with everything that is on the drive, and that’s Portable Firefox and Flash. That is, under most conditions, enough to carry your content.
You will however have to work using static HTML pages. But you do have a modern browser at your fingertips, one that you can take advantage of. CSS, Javascript, Flash et. al., are at your disposal. I use the Lightwindow Javascript library for images, which gives the recipient a nice, easy-to-view and easy-to-navigate system for images, especially those which can be large or are driven by thumbnails.
For Flash-based playback of MP3s, I use the XSPF Web Music Player. It is extremely small and uses easily-created playlists. Flowplayer is useful for playing back video. Note that none of these assets (video, images, or music) need be on the system to use these Flash widgets, but it might be handy to keep them local to prevent lots of delays in streaming, or if you want to truly make your app portable.
Did I mention that Lightwindow, XSPF Player, and Flow Player are all free? I guess I just did.
The point here is that your creativity shouldn’t feel stifled because you can’t use PHP or any other high-end scripting language. In fact, you should stay away from those for the purposes of your app. I’ve found that there is more than enough with the Firefox/Flash platform to serve just about all of my needs.
How you tackle the construction of the pages is up to you. Make them as bare-bones or as intricate as you’d like. The only constraint is the size of the media you’re going to put it on.
Locking Down Portable Firefox
When you have your app ready, it’s time to lock down everything. I like to do this in order to keep everything on rails, so that they are really only looking at the content of the disc or drive. However, if you want people to surf the Internet with this, you don’t have to do all of these things.
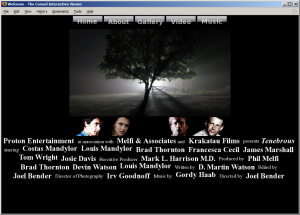
Turn off any toolbars you don’t want them to have access to, and install any special themes or extensions you may want it to have. I find that PF running as light as possible the best course because it results in faster load times and reduces any clutter, as you can see in the picture above. I also set the window size to something that seems to work for my project. Your mileage may vary; try out different window sizes by resizing it, exiting, then starting back up.
Finalizing: Going Read-Only
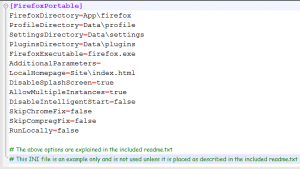
For proper functioning however, you should ensure that your installation of Portable Firefox is ready for your thumb drive or other portable media. To do so, you’ll have to edit the FirefoxPortable.ini file, located in the root of your project folder. Open it up and make sure the settings are similar to this:
Of special note is the RunLocally=false setting. This will essentially put PF in “read-only” mode, which means any changes you may make from here on out, including installation of additional themes, extensions, or plugins, may not work.
Also notice that the LocalHomepage setting is set to the Siteindex.html page. PF will always start with this as the landing page. If you have a different landing page filename, change it here. However, I strongly recommend index.html for convention.
Autorun and AutoPlay Setup
Autorun, while it may or may not be active on the viewer’s machine, is a nice extra touch. For those viewer’s machines that do have it turned on, it can launch your app automatically.
For CDs and DVDs, you can write a simple autorun.inf file and put it in the root of your project’s folder. An autorun.inf file is what Windows looks for on the media, and, if the feature is activated, will run the appropriate commands listed. You can also change the icon that appears for the drive from your custom autorun.inf file.
To write one, open up your plain text editor. Here is a sample:
This example will start up the program called TenebrousViewer.exe (I renamed the default PortableFirefox.exe file) and will use the appicon.ico file for the drive’s icon when placed into the drive. Simple and easy.
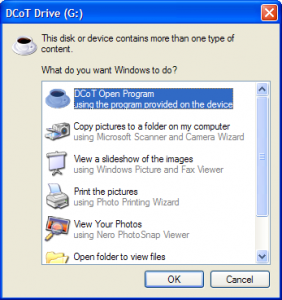
USB drives have a little more to them, as they can be scanned for files and pop up with an AutoPlay window. When this pops up, you can have your own custom message text appear, such as shown in the screenshot below:
You could have it say anything you want really, such as “Open My Movie’s Viewer”. Here’s an example of what else you’ll need to add to handle both Autorun and AutoPlay with USB thumb drives:
action=Launch Tenebrous Movie Viewer
You can also add in your own special menu items if someone right-clicks on the drive. For instance, say you wanted to have a command that would say “Read the Screenplay” and have it launch the PDF of your shooting script, you could add the following lines to the autorun.inf file:
shellreadScript=Read the Screenplay
shellreadScriptcommand=Sitescript.pdf
shell=readScript
Provided you have a file named script.pdf inside of the Site folder on the thumb drive, it will launch the PDF viewer on their system and load the screenplay for them to read.
Once you’re ready, put the autorun.inf file on the root of the thumb drive. To test it, unplug the drive and plug it back in. If you have AutoPlay enabled, you should see your customized INF file working.
Here is a sample autorun.inf file that you can modify for your own use:
[autorun]
open=TenebrousViewer.exe
icon=AppAppInfoappicon.ico
label=Tenebrous Movie Viewer
action=Launch Tenebrous Movie Viewer
shellreadScript=Read the Screenplay
shellreadScriptcommand=Sitescript.pdf
shell=readScript
Make sure you name the file, regardless of which media you use, to autorun.inf
Mastering for Media
Now that you’ve finalized everything, it’s time to put it on the media of your choice. This part is easy. For USB drives, simply copy the contents of your project folder to the thumb drive. For CD and DVD media, burn the contents of the folder.
If you want to go one step further to make the burning process even easier, you can make an ISO snapshot of the folder’s contents to burn later. Most disc burning software made today can burn an ISO image to CD or DVD in one step, instead of doing it over and over.
Advanced Stuff
Here’s some advanced things you could do:
Install a JSON library in with Portable Firefox. This will then make Web Services available from inside your app, such as having a remote guestbook, e-mail, PayPal API integration, Google Maps, etc. The sky’s the limit. The idea here is that you don’t have to put the entire app on the drive/disc and can allow even further interactivity with you, your site, and even other special content.
If you’re not sure what JSON or Web Services are, then you might want to skip this or talk to a local web developer geek who can explain the pros and cons of doing it.
If you’re burning to a DVD-4, DVD-9, Blu-Ray, or are using a super-large USB drive, your storage options allow you to also add in some other portable apps, such as Portable Apache Web Server, Portable PHP, and Portable MySQL. This will give you some heavyweight backend software to work with, but it might also be prohibitively expensive size-wise. You may want to ask yourself why you would need all of that extra software.
Links
Here are links to all of the tools I used and mentioned in this article. Every single one of these is free.
GIMP: Graphics editing. I use this in place of Photoshop.
Nvu: WYSIWYG web page editor.
Notepad++: An awesome text editor.
Portable Firefox: You’ll need this to get started.
7-Zip: A great universal compression program. Handles JAR files natively, as well as zip, gzip, tar, and just about every other compression format on the planet.
Lightwindow JS Library: Useful for your app if you want some nicer image viewing capabilities.
Flowplayer: Flash video player with many options.
XSPF Web Music Player: Compact and highly configurable player for MP3s.
Miscellaneous
It’s entirely possible I glossed over something here. If I did, and you have any questions, please leave a comment below and I will respond back as soon as possible to it.
One thought on “DIY Film Marketing and Branding with Free Tools”
-
Pingback: DIY Film Marketing and Branding with Free Tools | Insane Ramblings … | Drakz Free Online Service
Comments are closed.
